Feb 10, 2013
· #css · 5 min read
Tips & Tricks: the WordPress Photo Gallery
With WordPress 3.5 came an awesome revamp of the media library that allows users to easily place a photo gallery from new and old images within the media library. The gallery shortcode was introduced and provides quite a few different features, all available from a user interface and not just shortcode attributes. There are a few things missing from the user interface that can let you make the most out of your photo galleries. Here are a few tips and tricks to make the WordPress photo gallery integrate beautifully into your theme.
 While the column issue is easy enough for a regular seasoned WordPress user to adjust, it can be difficult to explain to a client and adds an extra step. What if the client forgets to edit the shortcode attribute and calls complaining because their gallery is only three pictures wide and "ruined" their website? Or if they edit the shortcode and mess up other attributes, breaking the gallery. In my opinion the best solution is to assume the gallery will be created using default options and adjust the CSS appropriately.
Now, as I said, WordPress injects the column CSS right before the gallery is outputted. That means you're going to need to use some !important declarations in your CSS.
Here is the CSS I recently used to override the <br /> inserted after each gallery row and style my gallery. The gallery thumbnails turn into a line of float: left elements that will wrap.
While the column issue is easy enough for a regular seasoned WordPress user to adjust, it can be difficult to explain to a client and adds an extra step. What if the client forgets to edit the shortcode attribute and calls complaining because their gallery is only three pictures wide and "ruined" their website? Or if they edit the shortcode and mess up other attributes, breaking the gallery. In my opinion the best solution is to assume the gallery will be created using default options and adjust the CSS appropriately.
Now, as I said, WordPress injects the column CSS right before the gallery is outputted. That means you're going to need to use some !important declarations in your CSS.
Here is the CSS I recently used to override the <br /> inserted after each gallery row and style my gallery. The gallery thumbnails turn into a line of float: left elements that will wrap.
Stylizing the WordPress Photo Gallery
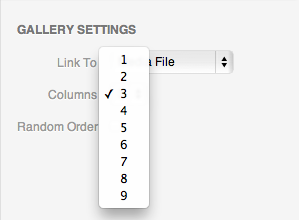
Default CSS is inserted directly into the page for the current WordPress gallery. Part of this is due to the column settings in the user interface. WordPress allows you to specify the number of columns the gallery should span. The user interface provides a dropdown of selections 1-9; it is missing 0 which removes any column styling. Here is a problem.While the column issue is easy enough for a regular seasoned WordPress user to adjust, it can be difficult to explain to a client and adds an extra step. What if the client forgets to edit the shortcode attribute and calls complaining because their gallery is only three pictures wide and "ruined" their website? Or if they edit the shortcode and mess up other attributes, breaking the gallery. In my opinion the best solution is to assume the gallery will be created using default options and adjust the CSS appropriately.
Now, as I said, WordPress injects the column CSS right before the gallery is outputted. That means you're going to need to use some !important declarations in your CSS.
Here is the CSS I recently used to override the <br /> inserted after each gallery row and style my gallery. The gallery thumbnails turn into a line of float: left elements that will wrap.
.gallery {
margin-bottom: 10px !important;
}
.gallery::after {
content: '';
display:block;
clear:both;
}
.gallery br {
        clear: none !important;
        display: none;
}
.gallery .gallery-item {
width: auto !important;
}
.gallery .gallery-item img {
margin-left: 8px;
border-radius: 4px;
border: 1px solid #cfcfcf !important;
}
That will reset your WordPress photo gallery and make it a little easier to control.
Adding a Lightbox Feature
By default WordPress doesn't include any type of lightbox feature for the media gallery; that is what plugins are for. However, I often skip the plugin hunting if it is a simple solution I can whip up - such as adding lightbox functionality. This step is going to require you to download a lightbox script and edit your theme's functions.php, or make one if it isn't there. Step One: Get a lightbox Go ahead and grab the jQuery Lightbox plugin, or Lightbox2 which I use in my Facebook Album plugin. Grab the files and add them to your theme, it would be useful to put them in a subfolder called js to stay organized (<your_theme_folder>/js/<script_name>.js). Step Two: Get WordPress to load the lightbox Okay, now you'll need to edit your theme's functions.php (or create the file if missing) to queue the lightbox script. Add the following lines of PHP to your functions.php filewp_enqueue_script('jquery');
wp_register_script( 'lightbox', '/wp-content/themes/your_theme/js/script_name.js');
wp_enqueue_script('lightbox');
That tells WordPress to check if the jQuery resources were loaded, and if not load them. Then it sets up to load the lightbox script. You'll need to change your_theme to the name of your theme's folder, and script_name to the file name of the lightbox script you chose. This is the preferred method of setting up required JavaScript - otherwise you can just include it in the header.php in your <head> element.
Step Three: Bring it to Life
Now we need to make a function to affect how WordPress works. Most lightbox scripts work by checking links for rel="lightbox" to initiate. By adding this code to your functions.php WordPress will add rel="lightbox" to all attachment links.
add_filter('wp_get_attachment_link', 'lightbox_hack', 12, 2);
function lightbox_hack($markup, $id) {
global $post;
return str_replace('<a href', '<a rel="lightbox['.$post->id.']" href', $markup);
}
This alters the WordPress wp_get_attachment_link function by switching the default link markup to adding the rel="lightbox". It also sets up a lightbox gallery using the current post's ID. This allows users to scroll through your gallery without closing the lightbox. For those who have used add_filter we need to set the priority around 12 because we will be modifying data coming out of a shortcode.
Now your gallery supports lightbox - except for one more thing! From the gallery settings the gallery must be set to "Link to: Media File" not "Attachment Page."
You are all set! Welcome to your WordPress photo gallery, now have fun.